World-Space Onion Skinning
Waypoint’s onion skins render in world space, not screen space. Move your GP objects around and your onion skins stay exactly where you drew them — they represent actual 3D positions, not viewport overlays.
World-space vs screen-space
Section titled “World-space vs screen-space”Blender’s native onion skins are rendered in screen space at the object level. They follow the GP object — if you move the object to a new position, the ghosts move with it. You lose all spatial context of where strokes were actually drawn.
Waypoint renders ghost geometry on the GPU at the real 3D coordinates of each stroke. Ghosts are spatially accurate regardless of where the GP object is now or where the camera is pointing. This is the behavior you’d expect coming from traditional animation — your previous drawings stay put.
Enabling onion skins
Section titled “Enabling onion skins”- Select a Grease Pencil object.
- Open the N-panel → Waypoint tab.
- Toggle Onion Skinning on.
- Set the Prev / Next frame range to control how many ghost frames appear.
Settings
Section titled “Settings”All onion skin settings live in N-panel → Waypoint → Onion Skin. Global defaults (ghost colors, default opacity) are set in Edit → Preferences → Add-ons → Waypoint.
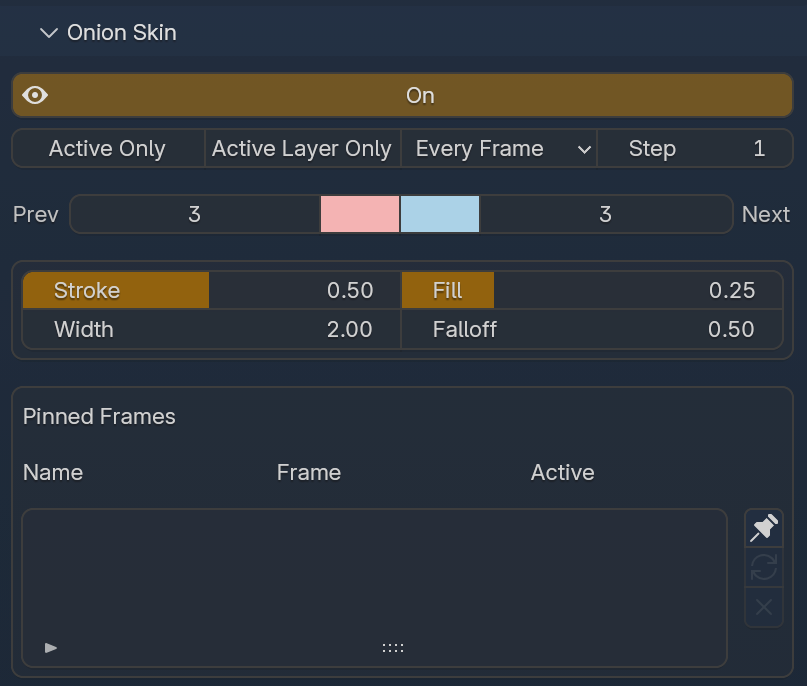
Filtering
Section titled “Filtering”The top row of the panel controls what gets included in the onion skin display.
| Setting | Description |
|---|---|
| Active Only | Only show onion skins for the selected GP object. Without this, Waypoint generates ghosts for every GP object in the scene. |
| Active Layer Only | Only show onion skins for the active GP layer. |
| Onion Skin Mode | Dropdown that controls which frames produce ghosts. Options: Every Frame (default) or GP Keyframes. |
| Step | Frame step interval. Default 1 shows every eligible frame. Set to 2 to show every other frame, 3 for every third, etc. |
Active Only is worth enabling on any scene with more than one GP object — it cuts out a lot of unnecessary ghost geometry and keeps the viewport clean.
Active Layer Only is useful when you have background, midground, and character layers on the same GP object and don’t want them all rendering as ghosts at once.
Onion Skin Mode is probably the most commonly toggled setting. During blocking you typically only care about your key poses, so switching to GP Keyframes strips out everything in between.
Frame range
Section titled “Frame range”| Setting | Default | Description |
|---|---|---|
| Prev | 3 | Number of previous frames to display as ghosts |
| Next | 3 | Number of upcoming frames to display as ghosts |
The color swatches between Prev and Next control the before and after ghost tint colors. Click to pick custom colors per-object — defaults are pink/red (before) and blue (after).
Higher values give you more temporal context but cost more GPU overhead. For most blocking and cleanup work, 2–4 in each direction is plenty.
Opacity
Section titled “Opacity”| Setting | Default | Range | Description |
|---|---|---|---|
| Stroke | 0.50 | 0.0 – 1.0 | Opacity of ghost strokes |
| Fill | 0.25 | 0.0 – 1.0 | Opacity of ghost fills — independent from stroke |
Stroke and fill opacity are separate controls. This is one of the key differences from Blender’s native system, where you get a single opacity slider for the entire ghost. Being able to drop fill opacity to zero while keeping strokes visible is useful when fills would otherwise obscure the line work you’re trying to reference.
Appearance
Section titled “Appearance”| Setting | Default | Description |
|---|---|---|
| Width | 2.00 | Multiplier applied to ghost stroke width. Values below 1.0 make ghosts thinner than the original strokes; above 1.0 makes them thicker. |
| Falloff | 0.50 | Controls how quickly ghosts fade out over the frame range. 0.0 = no falloff (all ghosts at equal opacity). 1.0 = maximum falloff (distant ghosts fade out aggressively). |
Keyframing settings
Section titled “Keyframing settings”Every onion skin parameter is exposed as a keyframeable property. Hover over any setting and press I to insert a keyframe, same as any other Blender property.
Practical uses:
- Fade onion skins in/out during specific shots by keyframing Stroke or Fill opacity
- Change the frame range dynamically — increase Prev / Next during a fast action, reduce during a hold
- Animate falloff — shift from uniform ghost opacity to aggressive fade-out mid-shot
- Toggle ghost colors — keyframe the before/after tint swatches to highlight specific sections of animation
Performance
Section titled “Performance”If the viewport feels sluggish with onion skins on:
- Reduce the Prev / Next frame range — fewer ghosts means less geometry to render
- Switch Onion Skin Mode to GP Keyframes — cuts out interpolated frames entirely
- Increase Step — show every 2nd or 3rd frame instead of every frame
- Turn on Active Only or Active Layer Only — limits ghost generation to what you actually need
Pinned Frames
Section titled “Pinned Frames”Pinned Frames let you lock specific frames as persistent overlays in the viewport. Unlike onion skins (which show adjacent frames), pinned frames can reference any frame in your timeline — making them useful as a lightbox-style reference while you work.
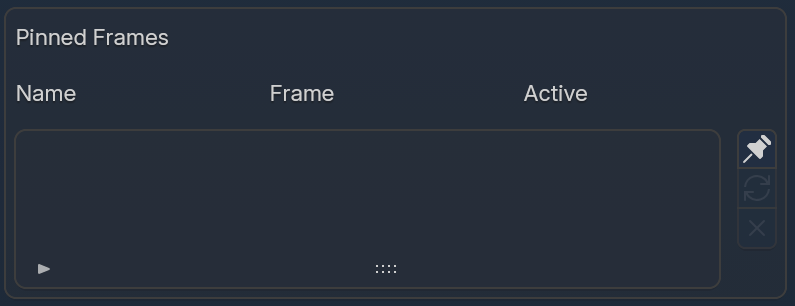
The Pinned Frames panel lives below the Onion Skin section in N-panel → Waypoint. It contains a list of your pinned frames with three columns:
| Column | Description |
|---|---|
| Name | Editable label for the pin. Defaults to the frame number but can be renamed to something descriptive (e.g. “Contact pose”, “Key A”). |
| Frame | The frame number this pin references. |
| Active | Toggle to show or hide the pin overlay in the viewport without removing it. |
The buttons to the right of the list:
- Pin (pin icon) — pins the current frame to the list
- Refresh (arrow icon) — updates the selected pin to the current frame
- Remove (X icon) — removes the selected pin from the list
How it works
Section titled “How it works”- Navigate to the frame you want to pin.
- Click the Pin button in the Pinned Frames panel.
- The frame is added to the list, and its strokes appear as a ghost overlay.
The pinned frame’s strokes persist no matter which frame you scrub to. Pin as many frames as you need — each one gets its own entry in the list and can be toggled on or off individually via the Active column.
Use cases
Section titled “Use cases”Reference key poses — pin your contact poses while working on breakdowns. The pinned ghost stays visible so you can match arcs and volumes without scrubbing back and forth.
Staying on model — pin a clean reference drawing and keep it visible while you rough in new poses. Acts like a traditional lightbox — your reference stays put underneath your working frame.
Held drawings — pin a background or held element that should remain constant across a range of frames as a visual guide.
Interaction with other features
Section titled “Interaction with other features”Motion Paths visualize object-level trajectory, while onion skins show the actual stroke content. Using both together gives you spatial trajectory context and drawing-level ghost reference simultaneously.