Motion Paths
Motion Paths map out your GP object’s trajectory as an editable curve directly in the viewport. Move your entire sequence, speed up and slow down beats by editing curve points, and use proportional editing for granular control of your keys, all without touching the graph editor.
The panel
Section titled “The panel”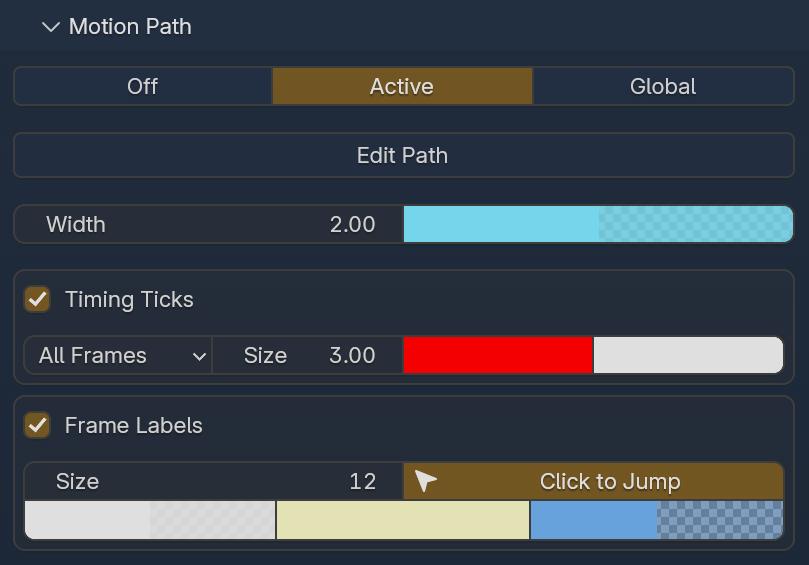
The top row controls whether the motion path is displayed and what scope it covers.
| Mode | Description |
|---|---|
| Off | Motion path is hidden. |
| Active | Show the motion path for the selected GP object only. |
| Global | Show motion paths for all GP objects in the scene. |
Path settings
Section titled “Path settings”| Setting | Default | Description |
|---|---|---|
| Edit Path | — | Enters edit mode on the motion path, and creates an editable curve primitive based on the motion path data. From here you can peform any operation on the curve, press enter, and it will update your keys and motion path. Press ESC to exit edit mode. |
| Width | 2.00 | Thickness of the trajectory curve in the viewport. |
The color swatches next to Width control the path line color and its opacity.
Timing Ticks
Section titled “Timing Ticks”Timing Ticks overlay markers along the motion path to visualize frame spacing. Enable via the checkbox.
| Setting | Default | Description |
|---|---|---|
| Tick Mode | All Frames | Dropdown that controls which frames display ticks along the path. |
| Size | 3.00 | Size of the tick markers. |
The color swatches control tick color and opacity. Tighter tick spacing means slower movement; wider spacing means faster — gives you an immediate read on timing without scrubbing.
Frame Labels
Section titled “Frame Labels”Frame Labels overlay clickable markers on the motion path. Enable via the checkbox.
| Setting | Default | Description |
|---|---|---|
| Size | 12 | Size of the label text on the motion path. |
| Click to Jump | On | Click a label in the viewport to jump to that frame. |
There are three color swatches that control the label color, label color on hover, background color on hover.
Editing the path
Section titled “Editing the path”Click Edit Path to enter edit mode on the curve. Each keyframe appears as a point on the path that you can manipulate. Between any given 2 points is the number of frames that the first keyframe is held for. When you are done editing the curve, hit Enter to update your keys and motion path, or press Esc to cancel the operation.
- Select a point on the curve and press
Gto move it — the corresponding keyframe updates in real time - Select two points on the curve, right click and select
Subdivideto create a new keyframe between them. Then hitShift + Rto repeat the action and create more keys - Visually edit the timing and spacing of your sequence by manipulating positions of the curve points
- Select key/s with
G, and enable proportional editing (O) to affect neighboring keyframes based on falloff, useful for smoothing arcs - Move your entire sequence by selecting all points on the curve, and moving them with the
Gkey to another location - Block your scenes in an entirely new way by creating one key, editing the motion path, and then hitting
Eto keep extruding the curve throughout your scene. Optionally you can hit7on the numpad to block from birds eye view, that way you can comfortably extrude the keys on XY axis
Moving points changes the spatial position of that keyframe. Stretching or compressing sections of the path speeds up or slows down the animation through that region.
Interaction with other features
Section titled “Interaction with other features”Cursor Sync — draw out your motion path as you block out the sequence with cursor sync, and then use the edit motion path feature to fine-tune the timing, spacing, and overall shape of your sequence. You can visually edit your animation in the viewport!
Onion Skinning — onion skins draw along the motion path, giving you spatial and temporal context simultaneously